Table of contents
Open Table of contents
Background
If you know me personally or have read some of my personal presentations on this blog or on GitHub, you will have seen that along with programming I also like system administration a lot. I started many years ago with a Raspberry Pi 1, until I got shortly after another Raspberry Pi 3b, going through renting VPS services, or as now, having a local dedicated server.
So I thought it might be interesting to show you the current state of my local server.
Let’s go for it.
Why selfhost
For me it is very easy; today we are in an era where it is difficult to ensure privacy where all our data are in that term so strange for some called “cloud”, and on more than one occasion we have seen news about how companies sell this data or make malicious use of them. For me this is a very important issue and my way to solve it, among other things, is by hosting services on my own infrastructure, that way I gain full control over my data and decide exactly where it resides and who has access to it.
So, my main reasons for self-hosting:
- Privacy: Privacy of my data is my main motivation for setting up a self-hosted homelab. Imagine you want to make some changes to a PDF document with one of the online tools out there. Would you feel safe uploading that PDF with sensitive information? You shouldn’t. Or those photos of your daughter’s birthday that are stored in the cloud. It is mainly because of cases like these and others that I decided to get into this world.
- Customization: By hosting my own services I can make modifications and tailor the services to my specific needs, gaining full control over the software and giving me the opportunity to tinker with the hardware.
- Learning: And last but not least, the possibility of learning that this offers me. In the end, being passionate about this world, all this kind of situations and the problems that derive from creating local environments like this give me an extra learning that together with my passion for technology, make me increase my knowledge in areas such as networking, server administration, and security, which are very valuable skills in today’s IT landscape.
Advantages of a Self-Hosted Homelab
- Cost savings: Although initially the investment in a server may be expensive, over time a local server will almost certainly be more cost-effective than subscribing to numerous cloud-based services. In fact, many of the services I use are based on or have paid alternatives that I would have to pay for if it weren’t for self-hosting.
- Data sovereignty: As I explained earlier, I no longer need to rely on cloud providers to keep my data secure and private. With a self-hosted homelab, no external cloud storage is used for sensitive data, everything stays in my local storage.
- Self-sufficiency: By running my own services, I don’t rely on external providers. I control uptime (to some extent), backups and performance.
My Setup
The following diagram illustrates the different components of my homelab at the time of writing this post.
Note: Most of the services are dockerized, the icon in front of the name indicates which ones are running under Docker.
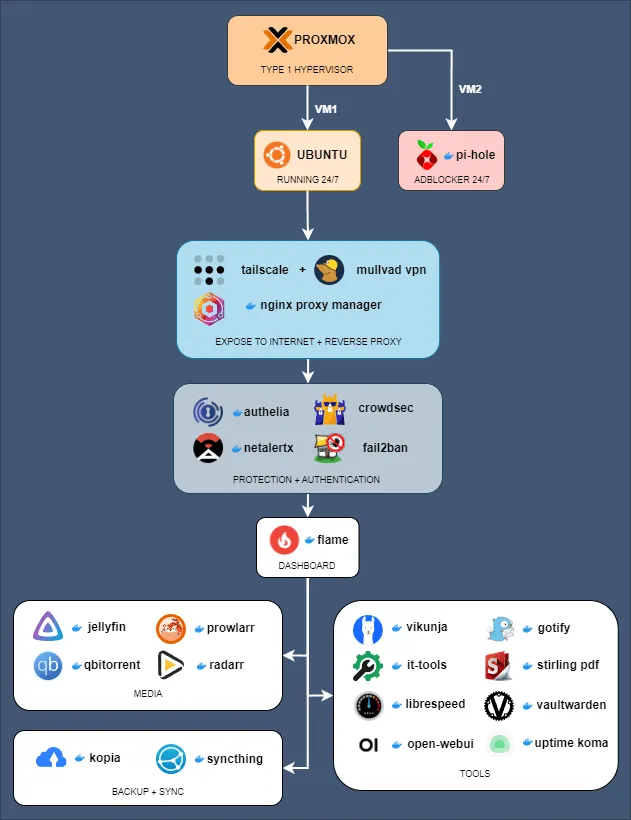
And now a brief explanation of the key elements:
- Proxmox (Hypervisor): For most of my time with a homelab I have been testing many distributions but they have always been installed directly on the server. It is only recently that I have been able to try Proxmox, a Type 1 hypervisor that allows me to run multiple virtual machines (VMs) efficiently. This gives me enormous freedom to test new features and modulate my server. In this particular case, I use one VM for my core services and another for Pi-hole, an ad-blocking solution.
- Ubuntu server: This is where my core services are located. This virtual machine runs 24/7 and hosts all the key services. Exposure to the internet is done through services such as Nginx Proxy Manager, Tailscale (for VPN access), and Mullvad VPN (for privacy).
- Layer of security: I prioritize security by adding layers of protection such as Authelia for authentication, CrowdSec for security monitoring, and Fail2ban to prevent brute force attacks. Netalertx provides monitoring for my local network, scanning for new devices and logging connection times.
- Flame control panel: This is my centralized dashboard for accessing all of my homelab’s services. It simplifies navigation and facilitates access to multimedia tools and services. Flame is not the most complete or complex, it does not show any internal data about the services but I like it this way, clean and simple.
- Media and backup solutions: For media, I use Jellyfin to host my media library and stream it locally. I also use qBittorrent and Radarr for media management. Backup and sync are managed by Kopia (I have also used Borg and Restic in the past) and Syncthing, this way I make sure my data is securely backed up and synced across all my devices.
- Productivity and tools: I also host productivity tools like Vikunja for a good and comprehensive task management tool, Gotify for notifications, and Librespeed for network speed testing. I run other utilities like Vaultwarden (a self-hosted password manager) and Uptime Kuma (for uptime monitoring) among others. This is the part that changes the most, since except for the permanent ones I am always adding and testing new services.